Hosted AI agent
The hosted flow walks an AI agent across your repo's HTTP handlers, surfaces every auditable one for review, and opens a pull request that wires Everscribe in for you. End to end: under five minutes for most repos, plus whatever review you choose to do.
Want to try it without touching your own repo? Fork github.com/everscribe/ai-assisted-setup-demo — a deliberately un-instrumented multi-tenant SaaS demo we maintain as a no-stakes target for this flow. Install the GitHub App on the fork, connect it, and run through the steps below. The resulting PR exercises the full pipeline against a known-good codebase.
What you need
- A project on Everscribe — sign up if you haven't, then create one
- A GitHub repo you can install our GitHub App on (or that already has it installed via your org)
- Go or Node as the backend language — see Supported SDKs for the current list
1. Install and connect the GitHub App
From your project's Overview tab, the Configuration card walks you through two steps. The first connects our GitHub App to the repo:
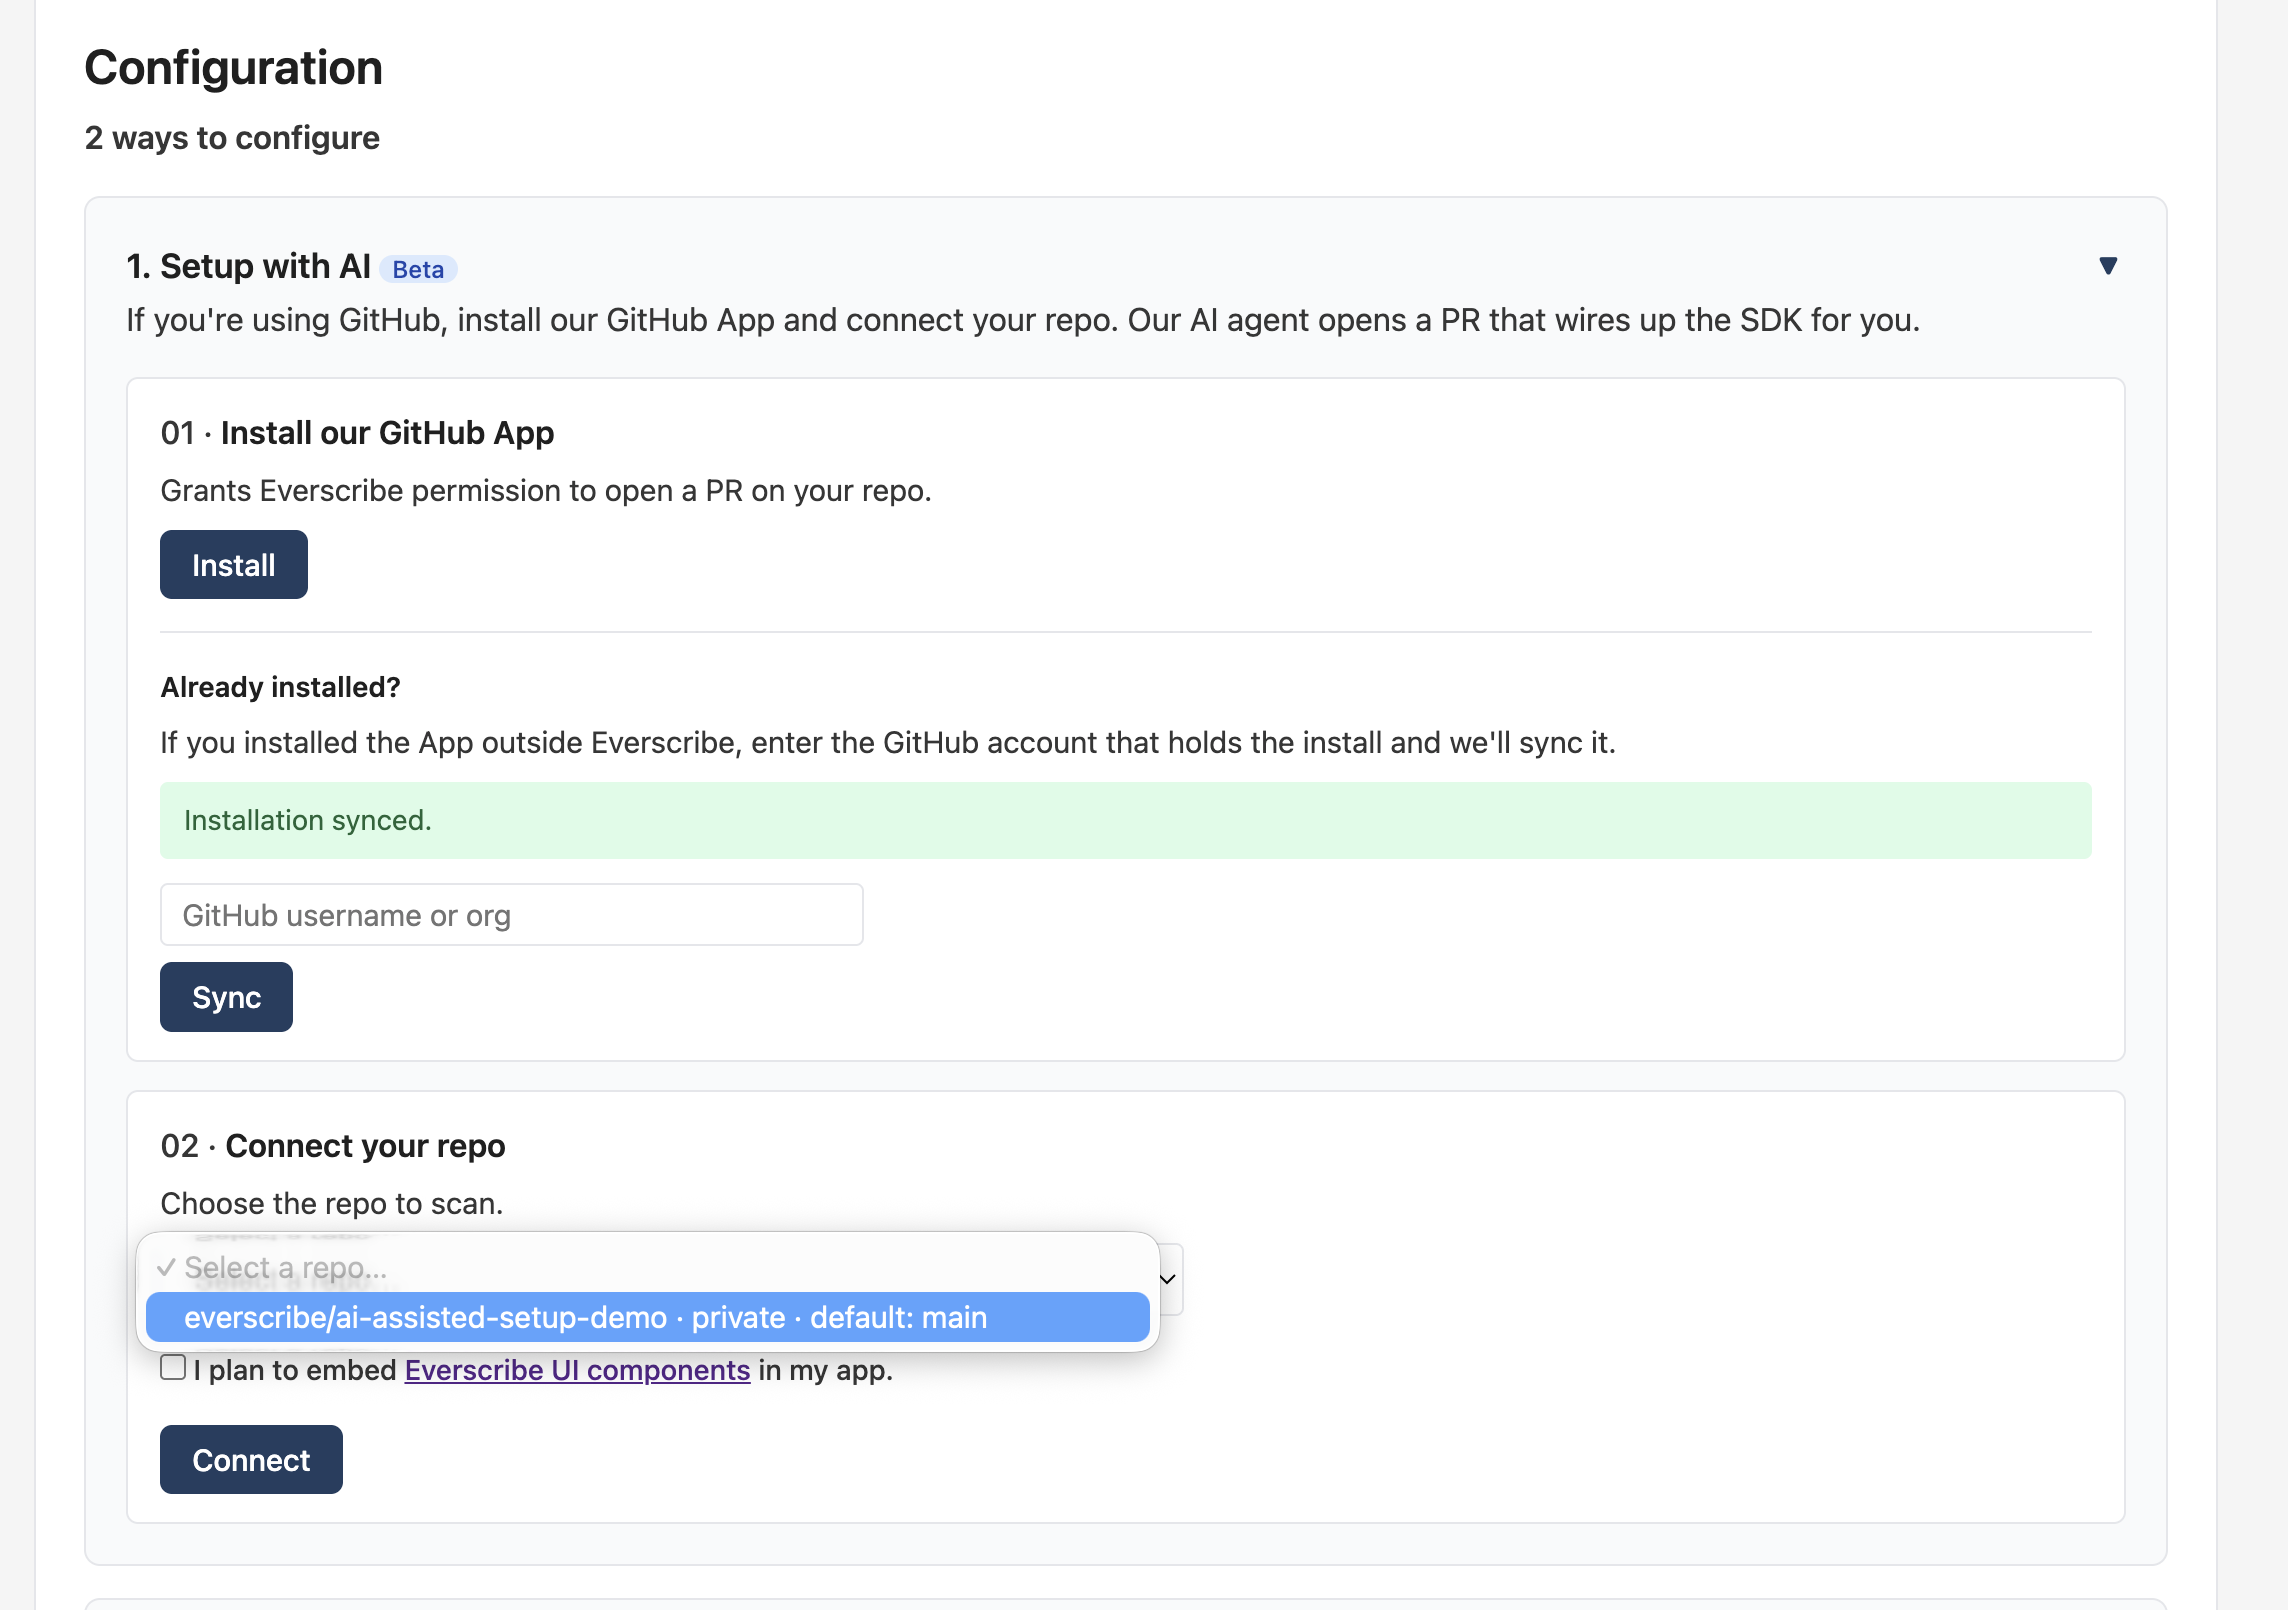
The Install button opens GitHub's app-install flow. Once you've granted access, you're redirected back here and the page recognizes the installation. If you already installed the App through your org, enter the GitHub login that owns the install in the Already installed? field — we'll sync the installation record on our side without re-installing.
Note: Check I plan to embed Everscribe UI components it if you want the resulting PR to also wire the
<AuditTrail />component into your frontend and add a tenant-scoped embed-token endpoint to your backend. Leave it off for a backend-only setup. You can preview and amend the agent's placement decision later from the Embed component card on the review surface.
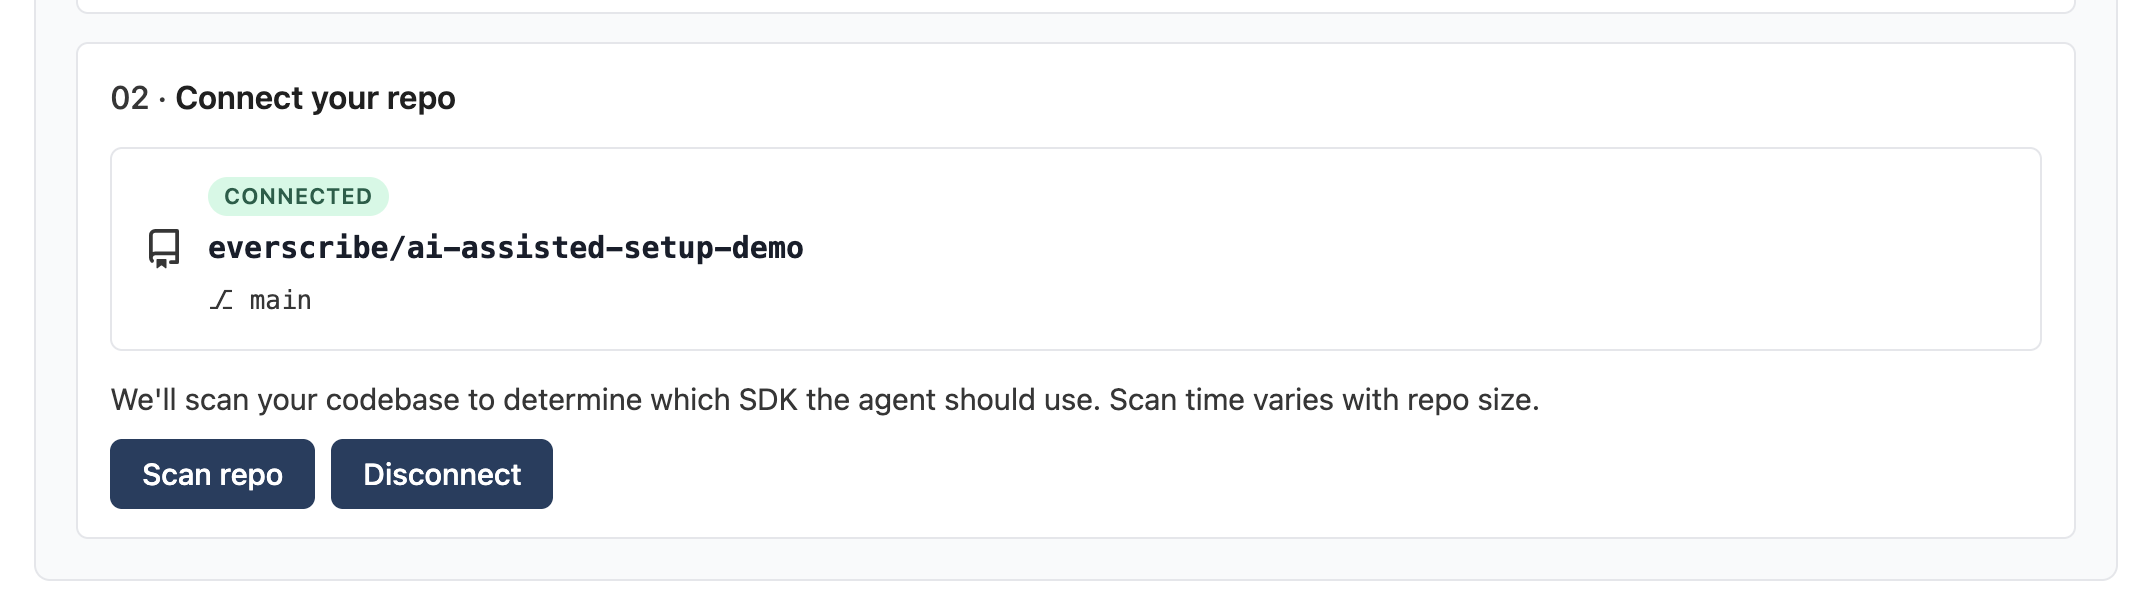
2. Connect a repo
Step 2 lists every repo the installation grants access to. Pick the one you want to instrument:
The optional I plan to embed Everscribe UI components checkbox tells the agent to also add the <AuditTrail /> component + a tenant-scoped embed-token endpoint to your frontend in the resulting PR. Leave it off if you only want the recorder + middleware wiring.
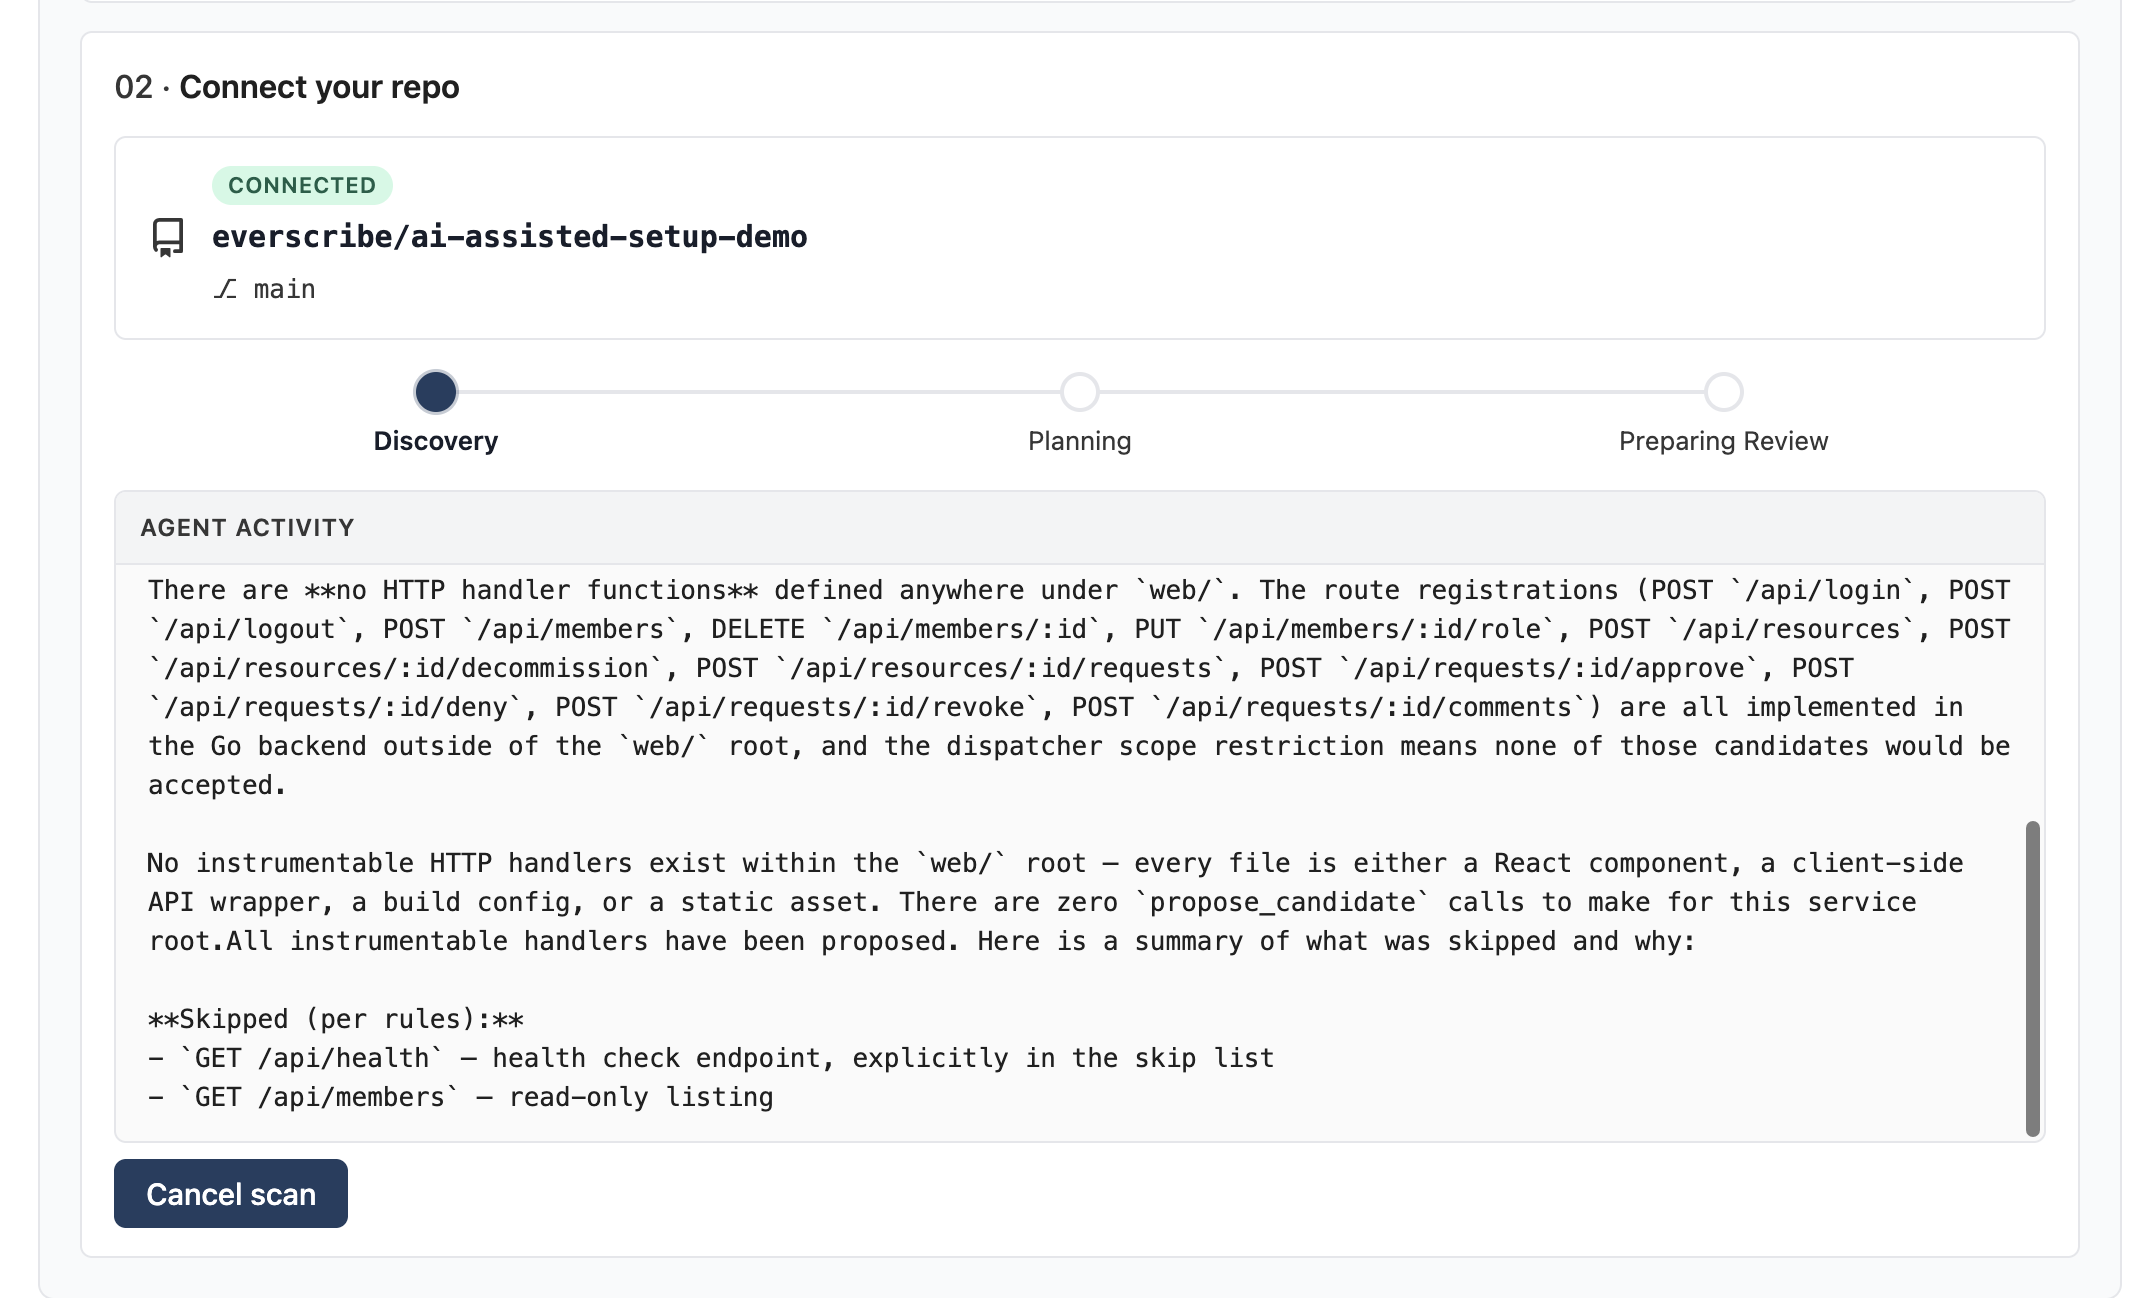
3. Scan repo
Click Scan repo. The progress panel shows a three-step pipeline: Discovery, Planning, Preparing Review. The agent's live thinking streams into the Agent activity log under the stepper so you can watch what it's doing.
Discovery walks your service tree to identify every mutating HTTP handler:
Planning enriches each discovered handler with an event name, tenant source, confidence level, and rationale:
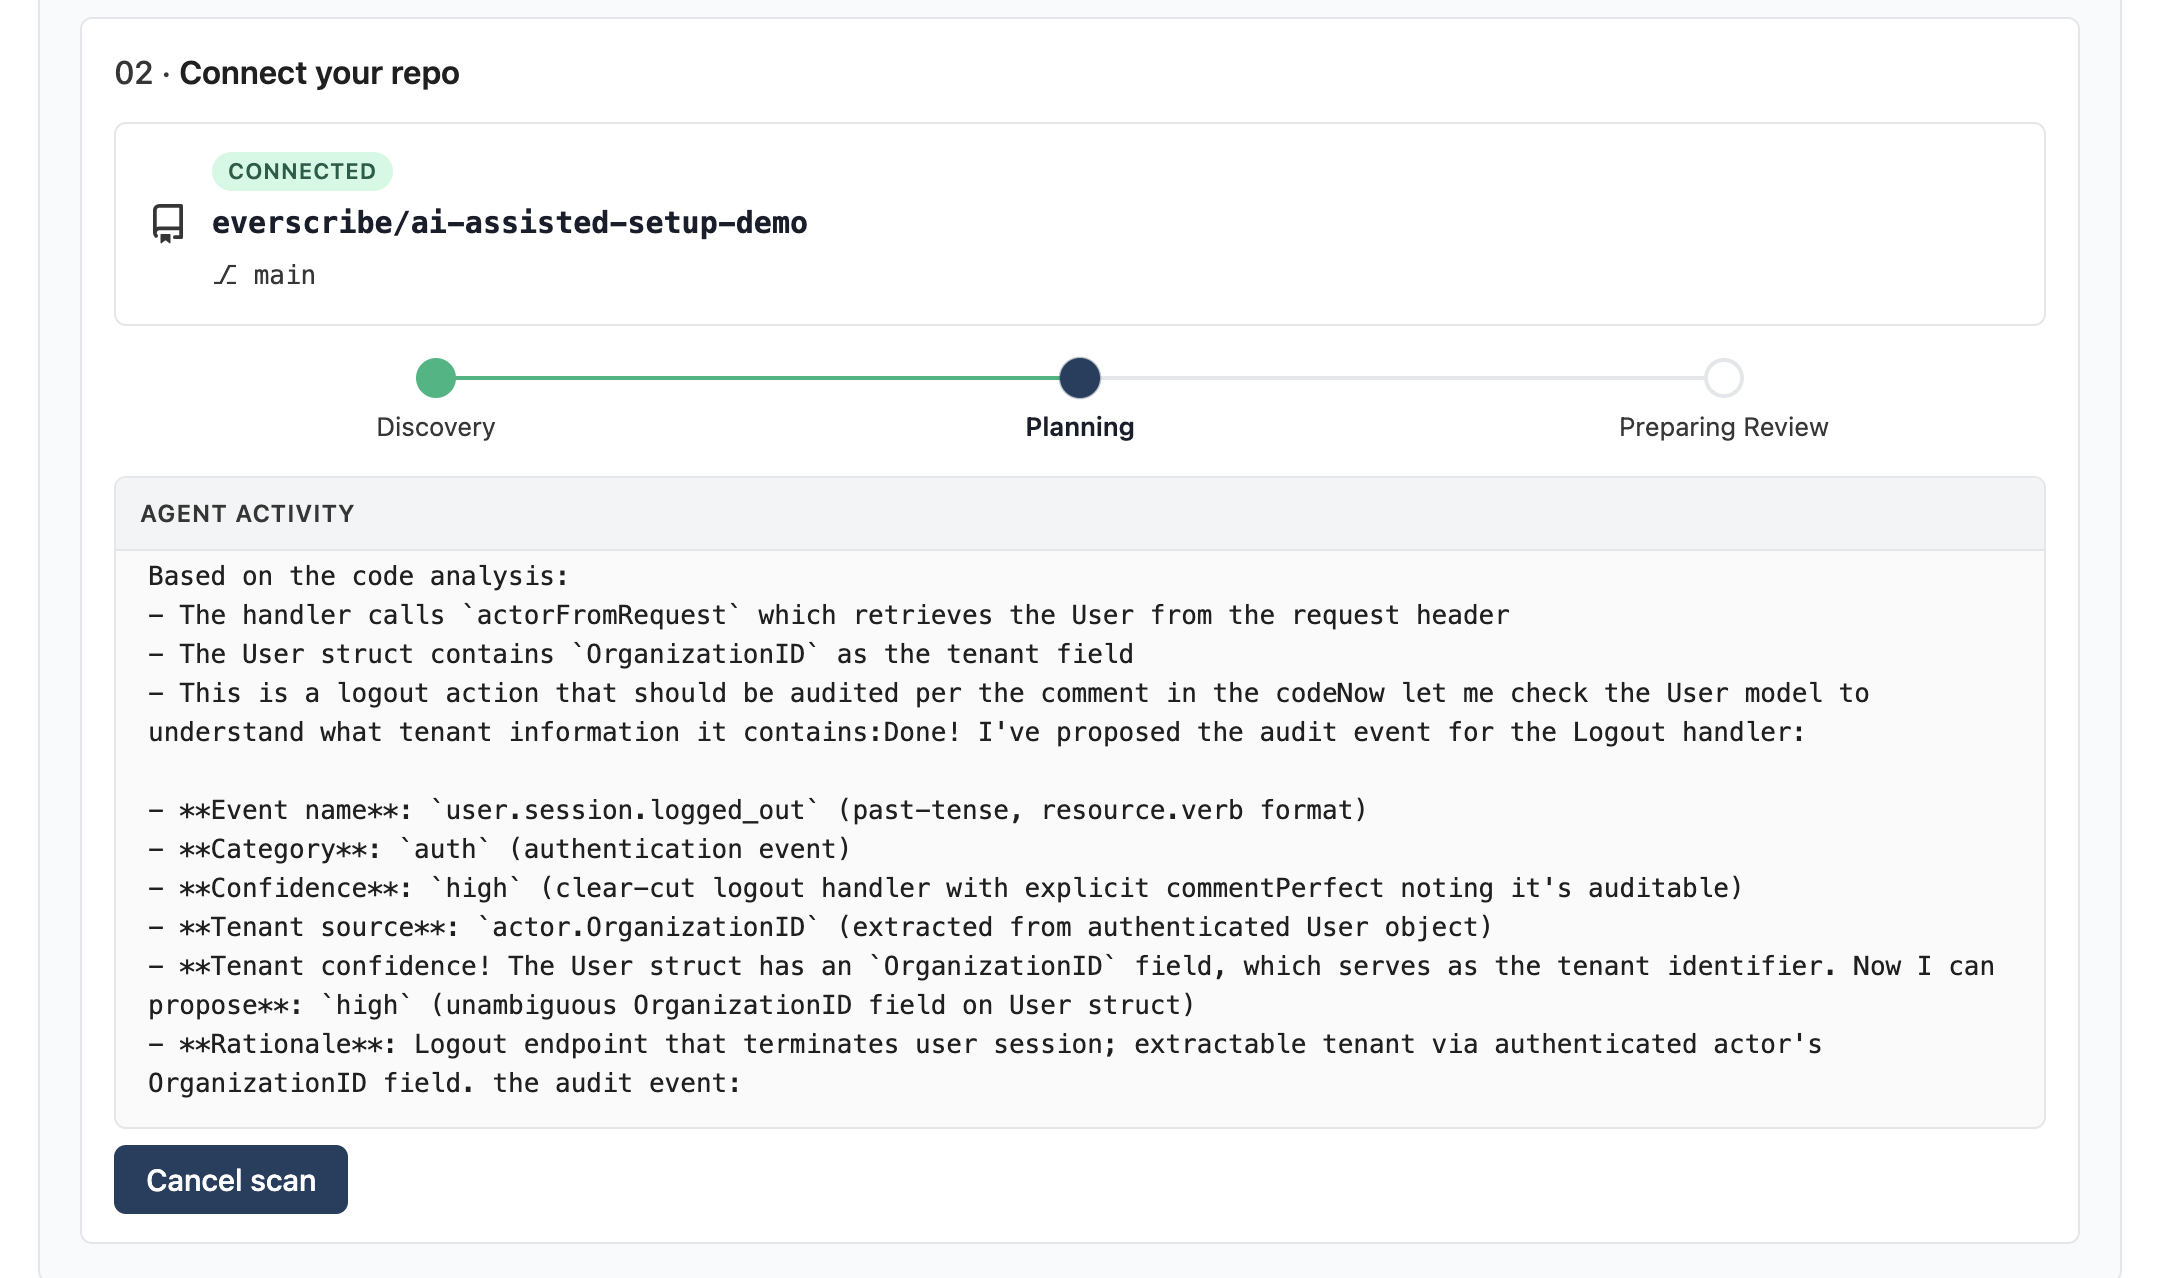
Wall time depends on repo size.
4. Review the scan summary
When the agent's done you land on the Review Scan Summary page. Two panes: the candidate list (left), grouped by category, and a chat-with-the-agent surface (right).
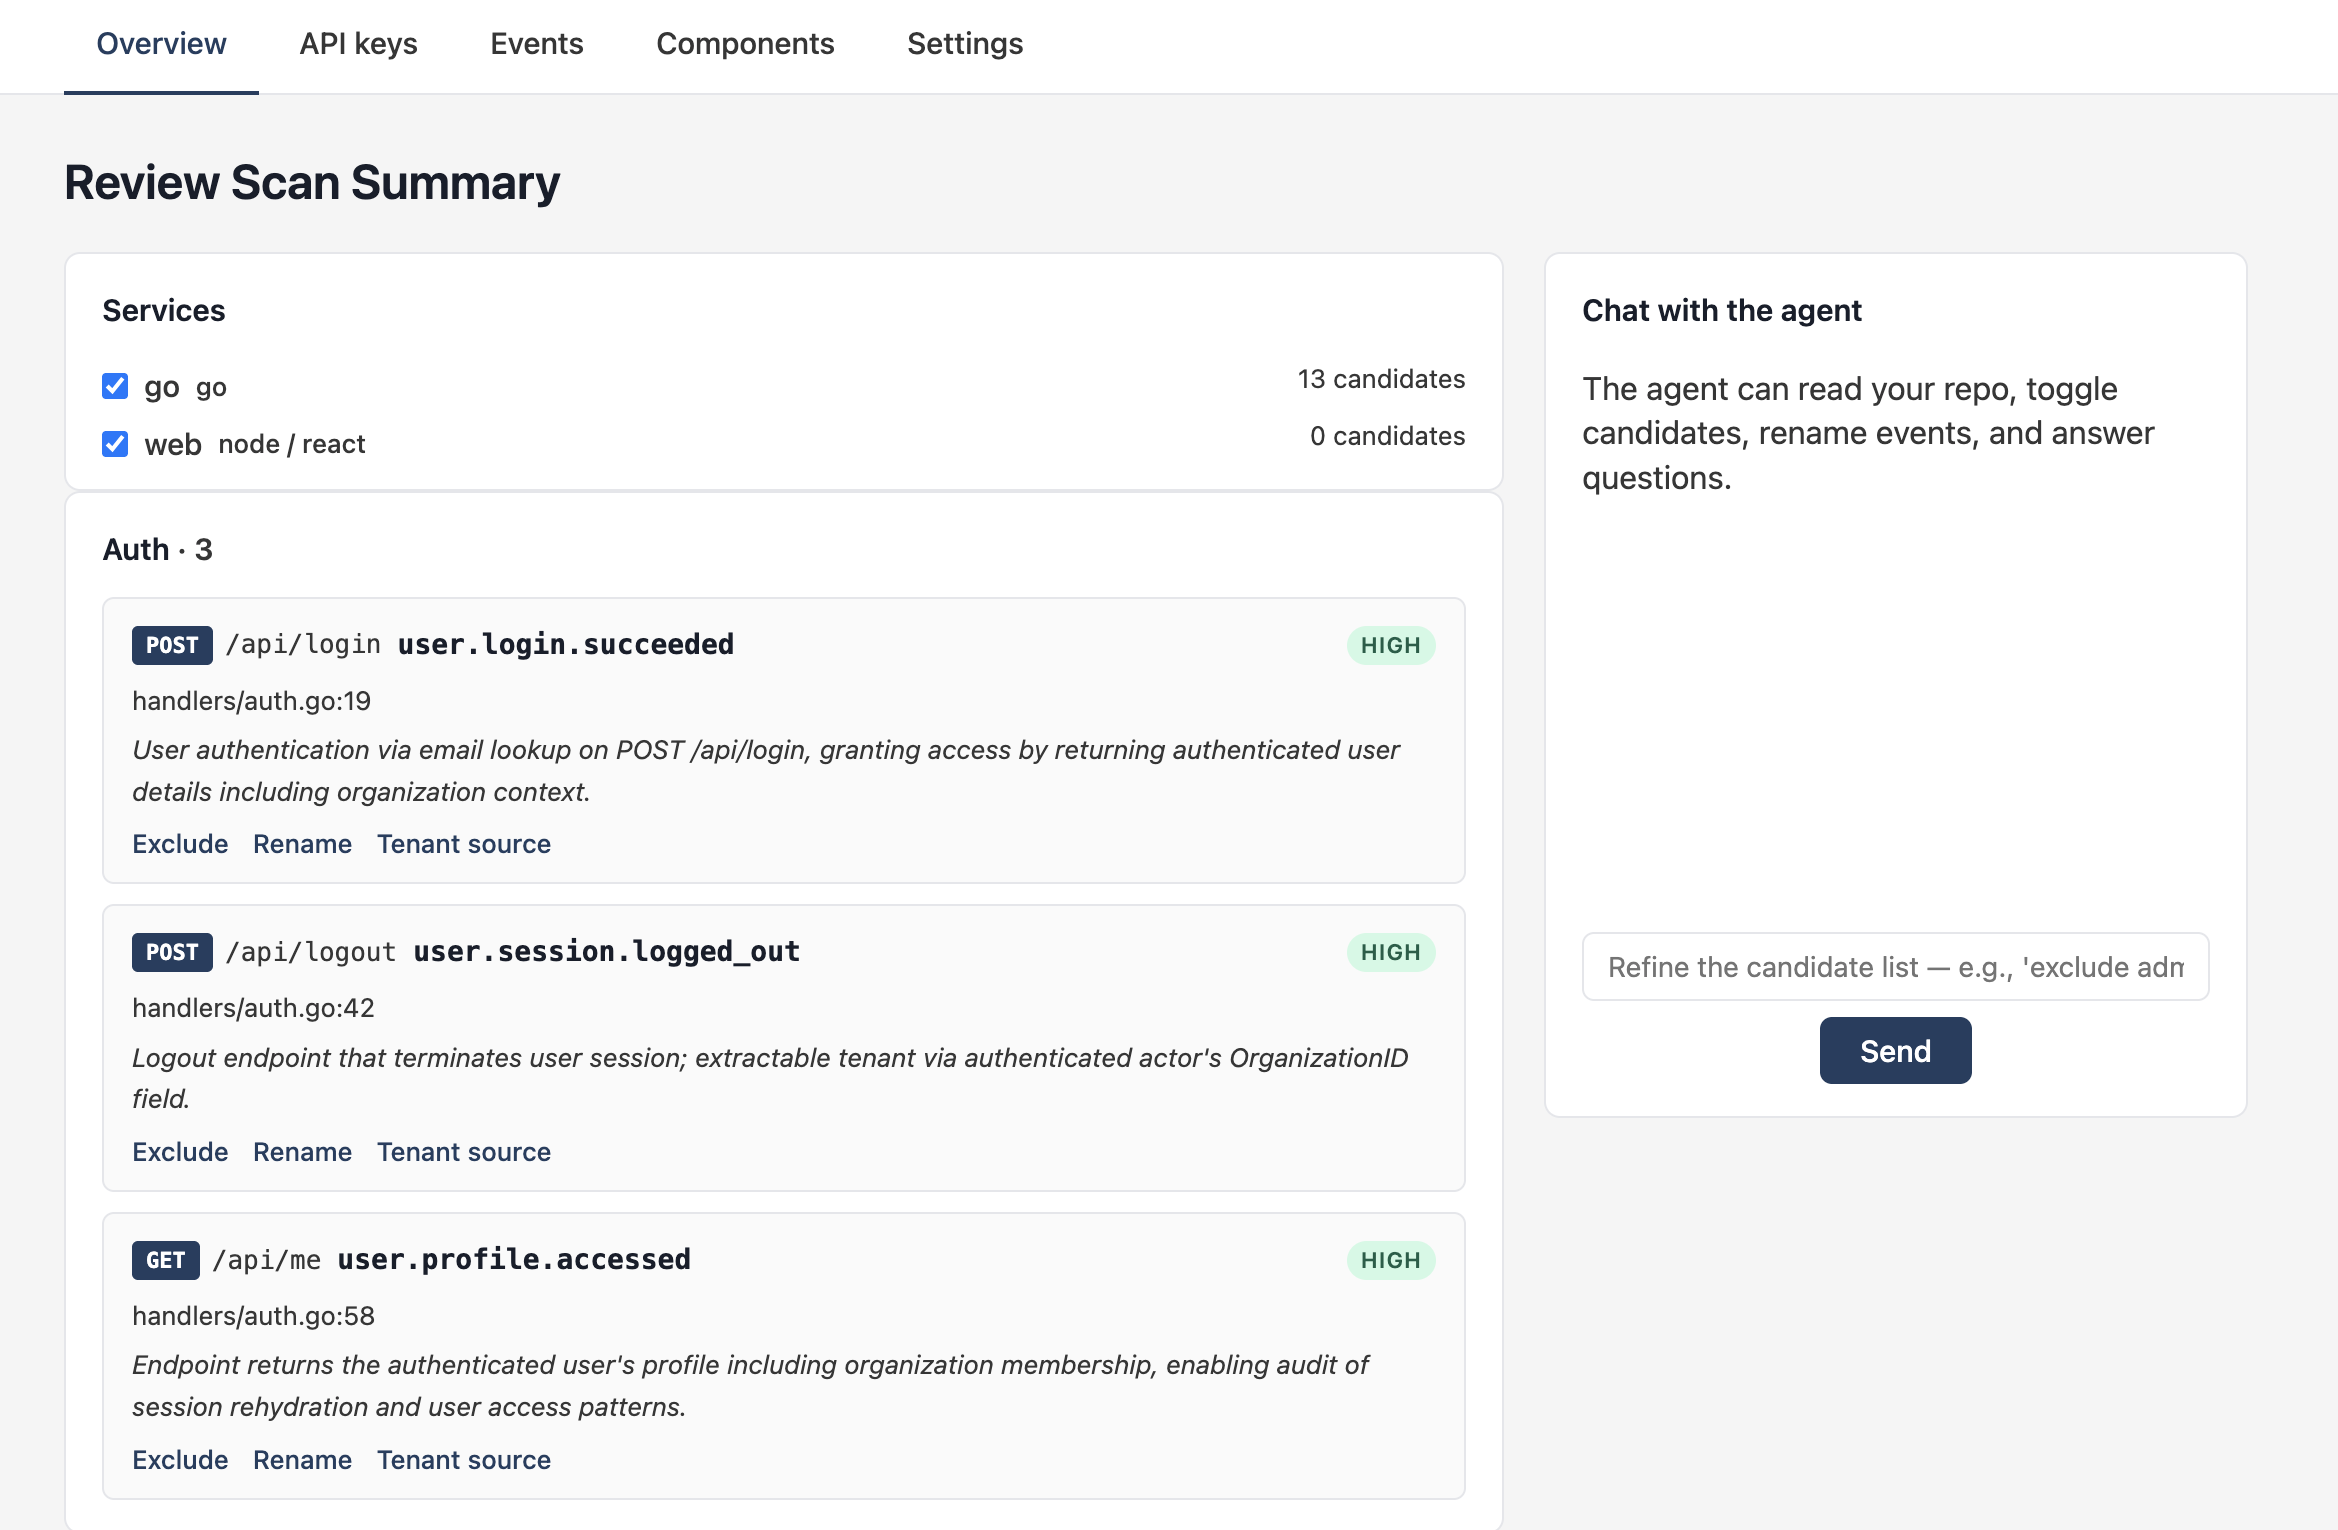
Each card shows:
- Method + route pattern (
POST /v1/login) - Proposed event name (
user.session.started) - Confidence pill (HIGH / MEDIUM / LOW / UNKNOWN)
- Source file and line
- The agent's rationale — why it thinks this handler is auditable
Three inline actions per card:
- Exclude — drops the handler from the PR
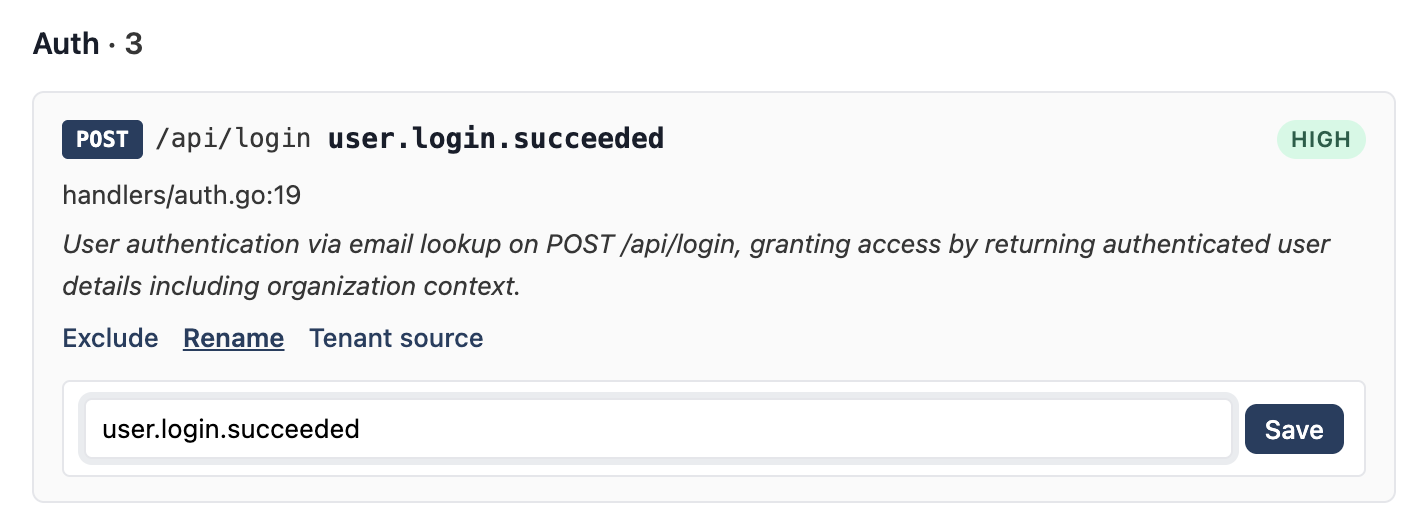
- Rename — change the event name
- Tenant source — change which expression the agent reads
TenantIDfrom, plus your confidence in that choice
5. Refine via the agent
The chat pane lets you direct the agent in plain English. It can toggle candidates, rename events, change tenant sources, read parts of your repo on demand, and answer "why did you classify this one as low confidence?"
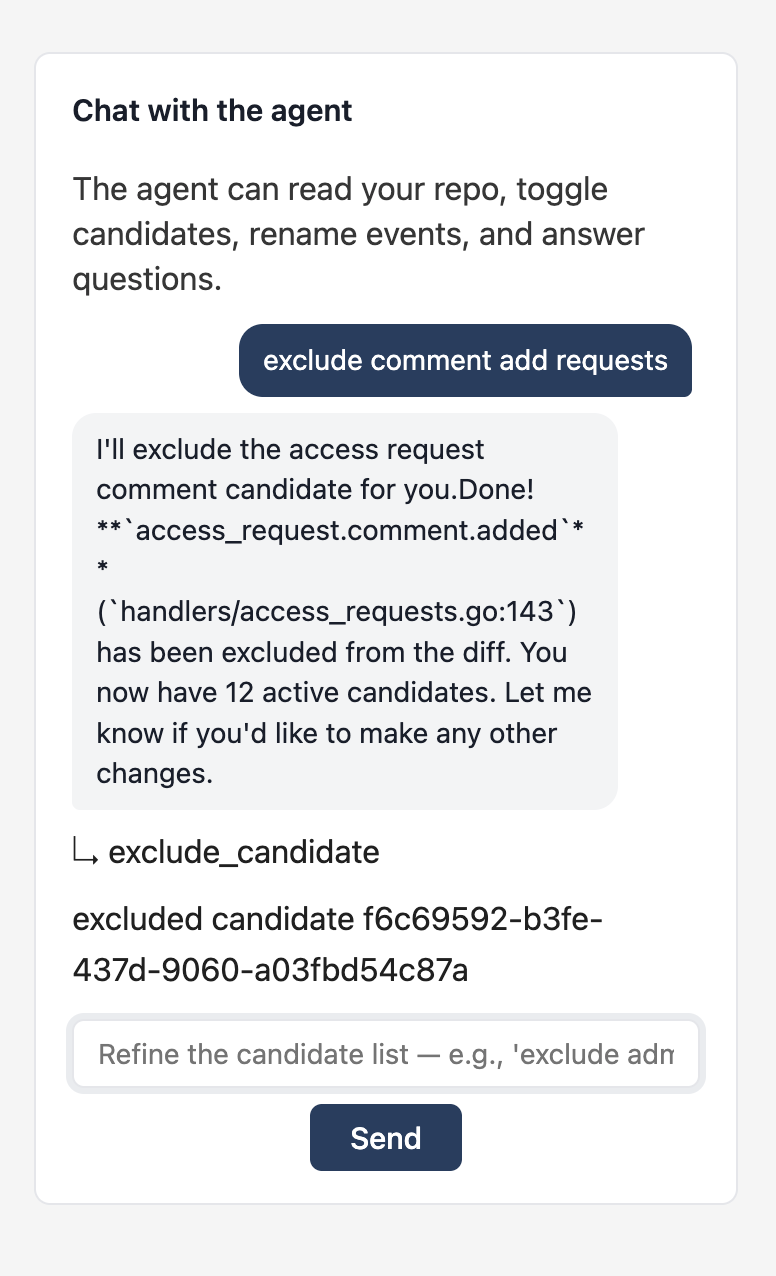
Same actions are available inline on each card if you'd rather click than type. The rename form takes the new event name in resource.verb dot-notation:
For tenant sources, the agent's first guess is usually a me.WorkspaceID / me.OrganizationID / req.user.OrgID-style expression read from the handler's scope. If it picked the wrong field, edit it inline:
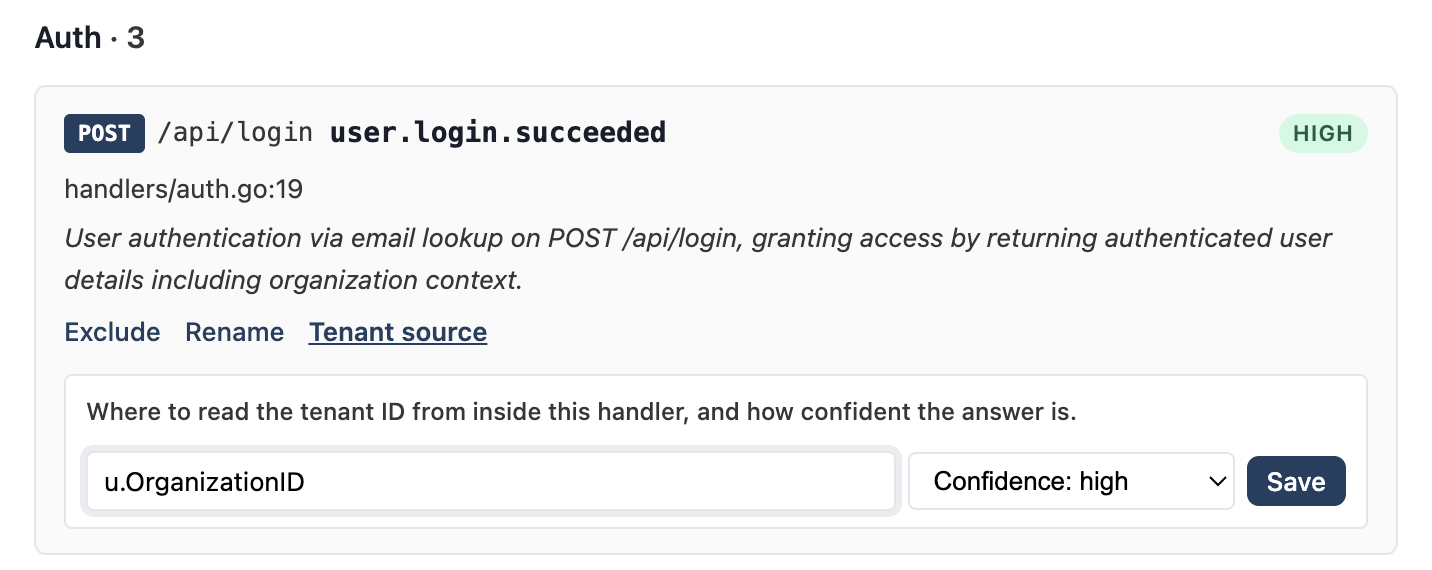
The confidence dropdown drives whether the diff-generation stage escalates to Opus on uncertain handlers.
Embed component placement
If you checked I plan to embed Everscribe UI components back in step 2, an Embed component card renders below the candidate list. It shows where the agent decided to mount <EverscribeEvents /> in your frontend and where the minter route will land in your backend:
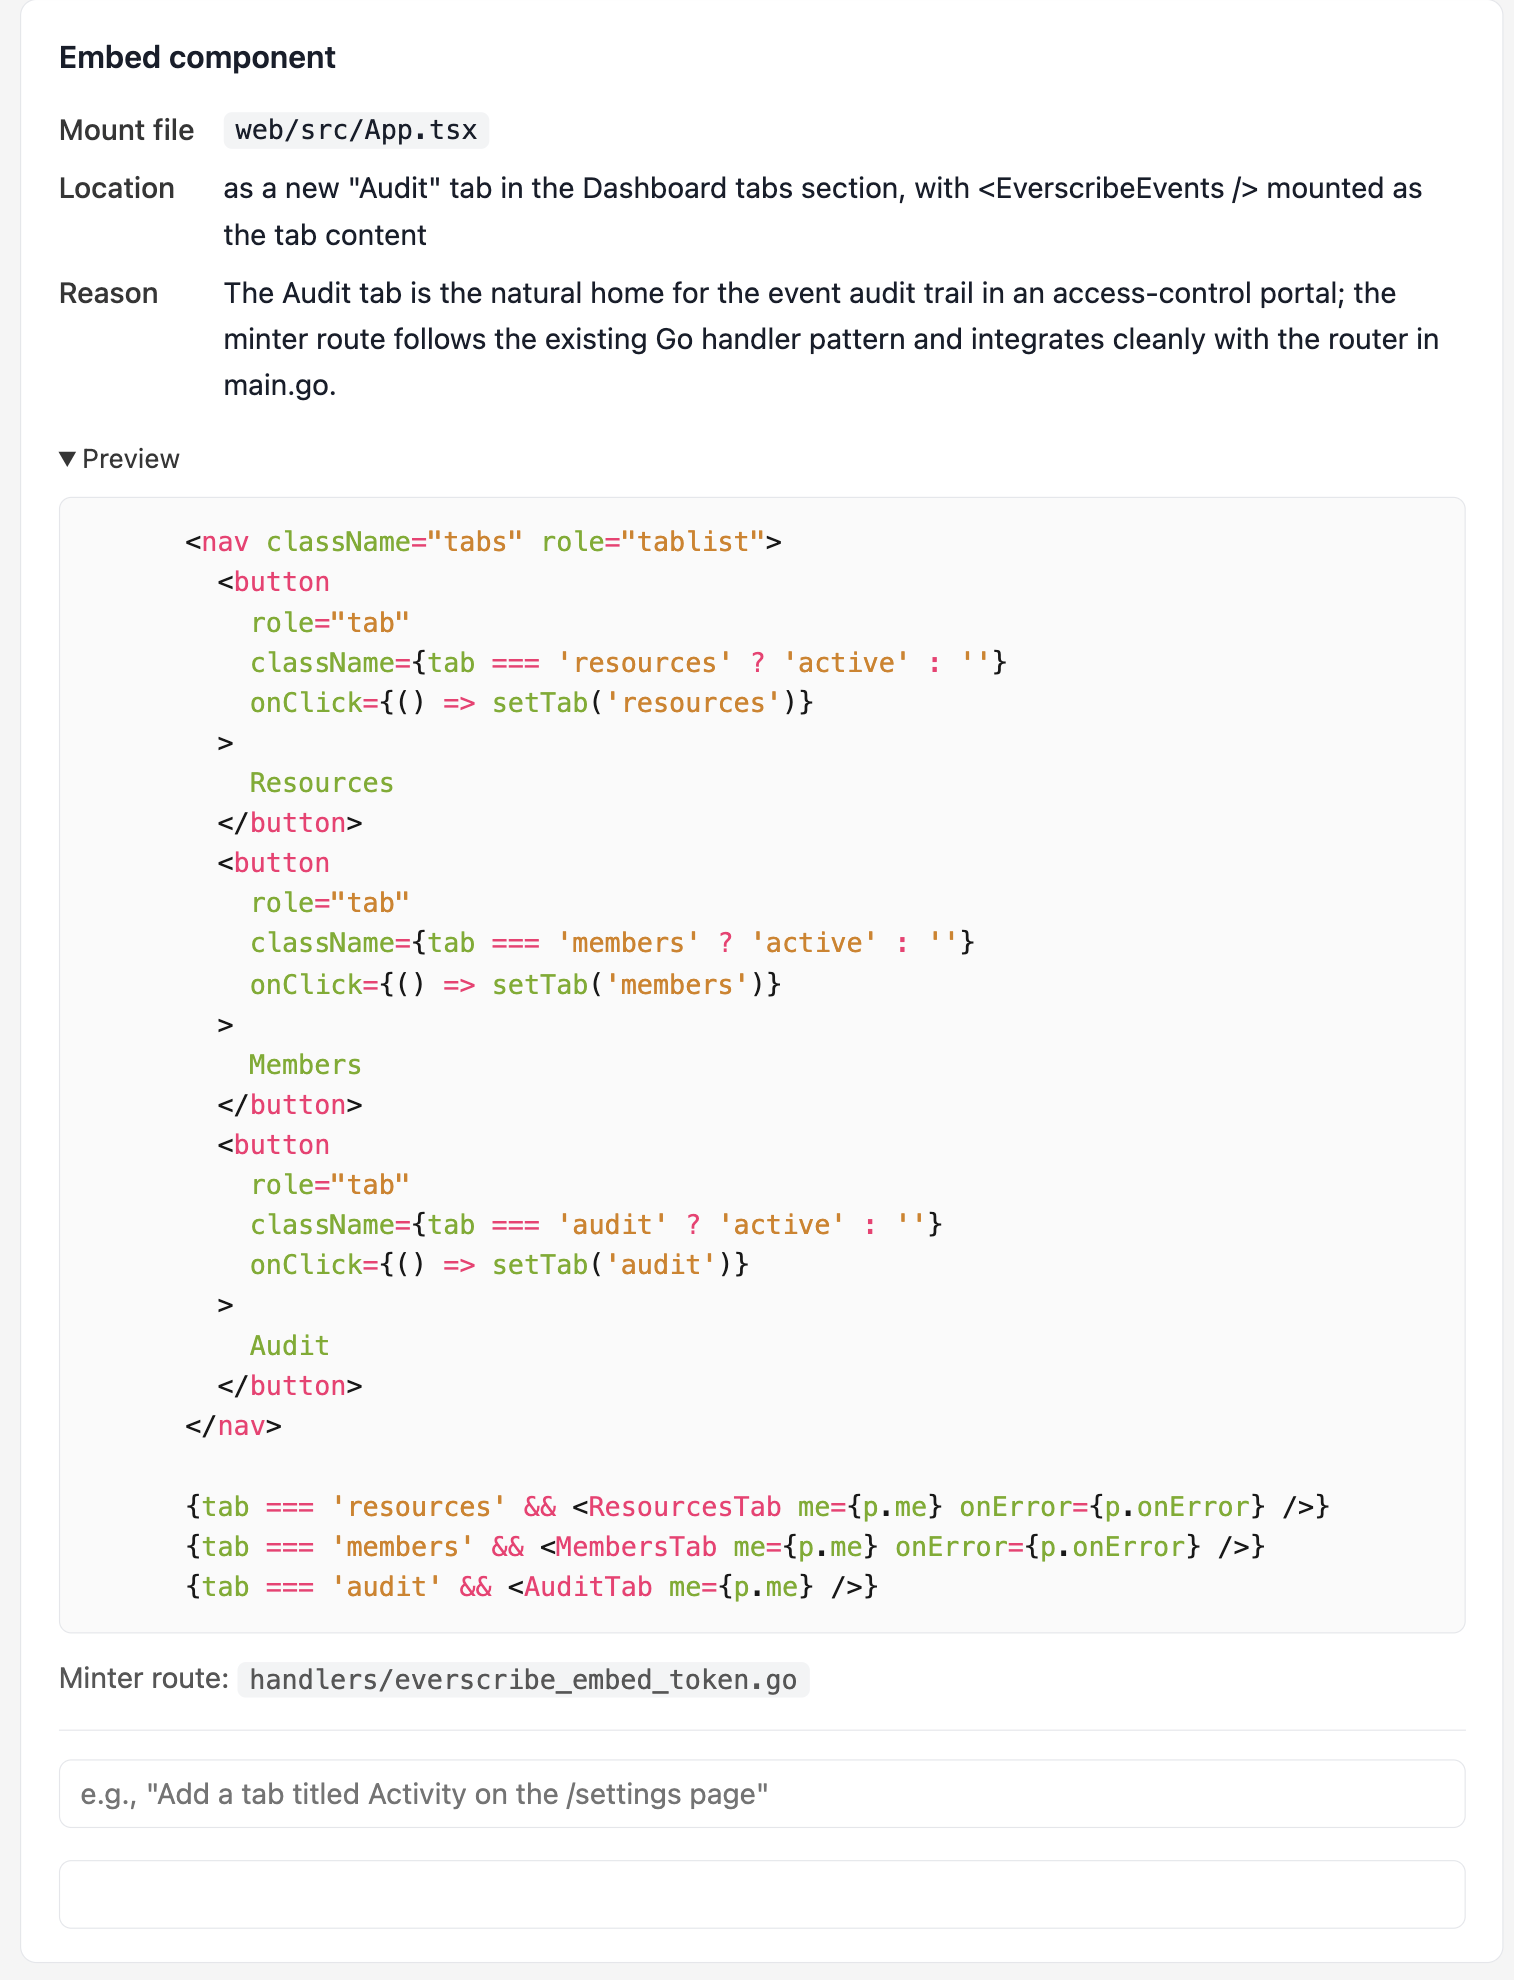
The card surfaces:
- Mount file — where in the frontend the component will go (often a new page or an existing admin/audit route)
- Location — a short phrase describing the mount's position within that file (e.g., as a new tab in an existing tab group)
- Reason — why the agent picked this spot
- Preview — a syntax-highlighted snippet of the host file with the component inserted, so you can sanity-check the placement before committing
- Minter route — the backend file that will get the embed-token endpoint
Three states depending on what the agent could detect:
- Full placement — frontend + backend both found; the card shows mount + minter + preview, as above.
- Minter only — backend found, no frontend service in the repo; the agent wires the minter and tells you to mount the component yourself in your separate frontend codebase.
- Skipped — neither a frontend nor a backend was detectable; the PR will not include any embed wiring and the card explains why.
The text input at the bottom of the card is a focused chat surface for amending just the placement. It accepts prompts like "Move the component to /settings as an Activity tab" or "Put it under the existing admin dashboard route instead". Off-topic prompts (renaming an event, excluding a candidate) are refused and redirected to the main chat pane on the right.
When the agent applies an amendment, the card re-renders with the new mount file, location, and preview reflecting the change. The next time you open the PR, the diff will use whatever placement is current in the card.
6. Open PR
When the candidate list looks right, click Open PR. A modal walks you through the two-step PR creation pipeline:
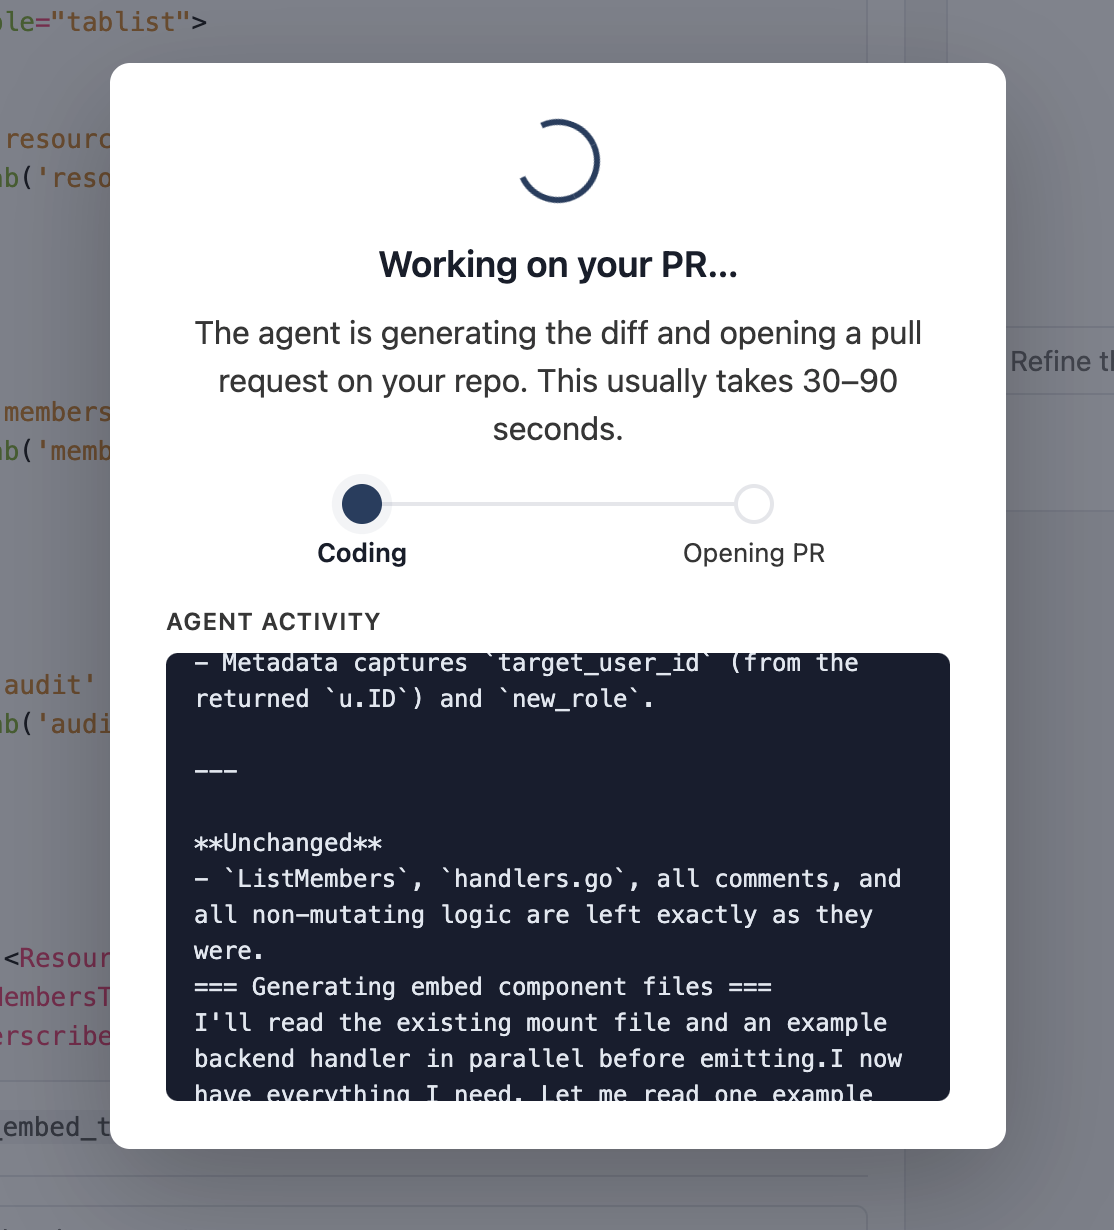
Coding is the diff-generation stage — the agent produces the full new contents of every file it's touching, in parallel. Opening PR is the commit-and-PR step on the GitHub side, served by our GitHub App.
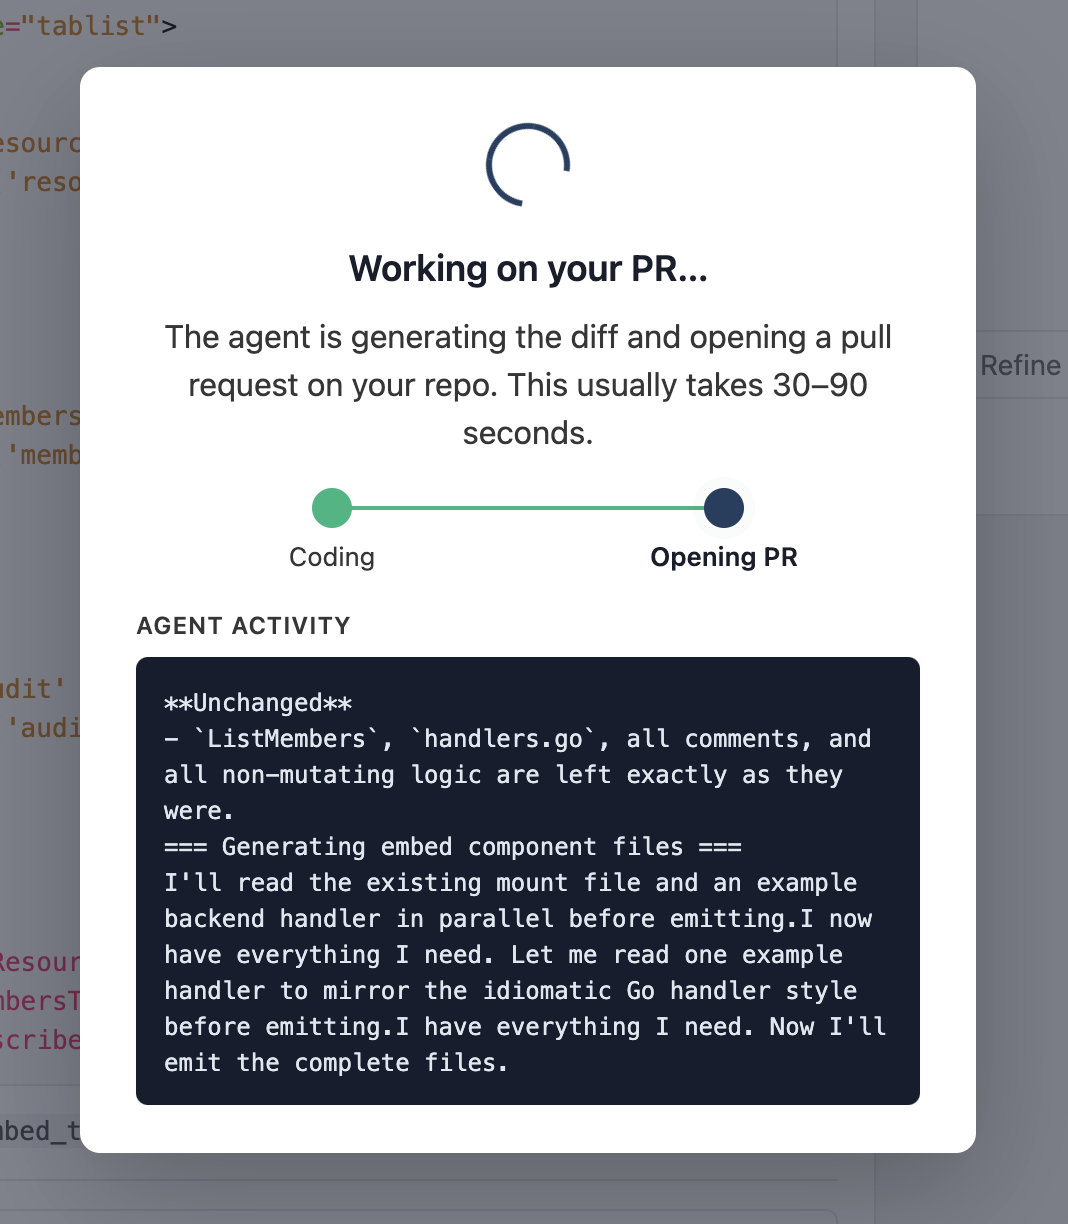
On success, the modal flips to a green checkmark + a Continue button:
Total wall time depends on how many files the diff touches; for a typical 5–15 handler PR, expect 20–60 seconds.
7. Save your ingest credentials
Continue lands you back on Overview. Because this is the first PR opened for this project, we mint a fresh ingest API key and show it once. Copy the env vars into your secrets manager now — we don't keep the plaintext:
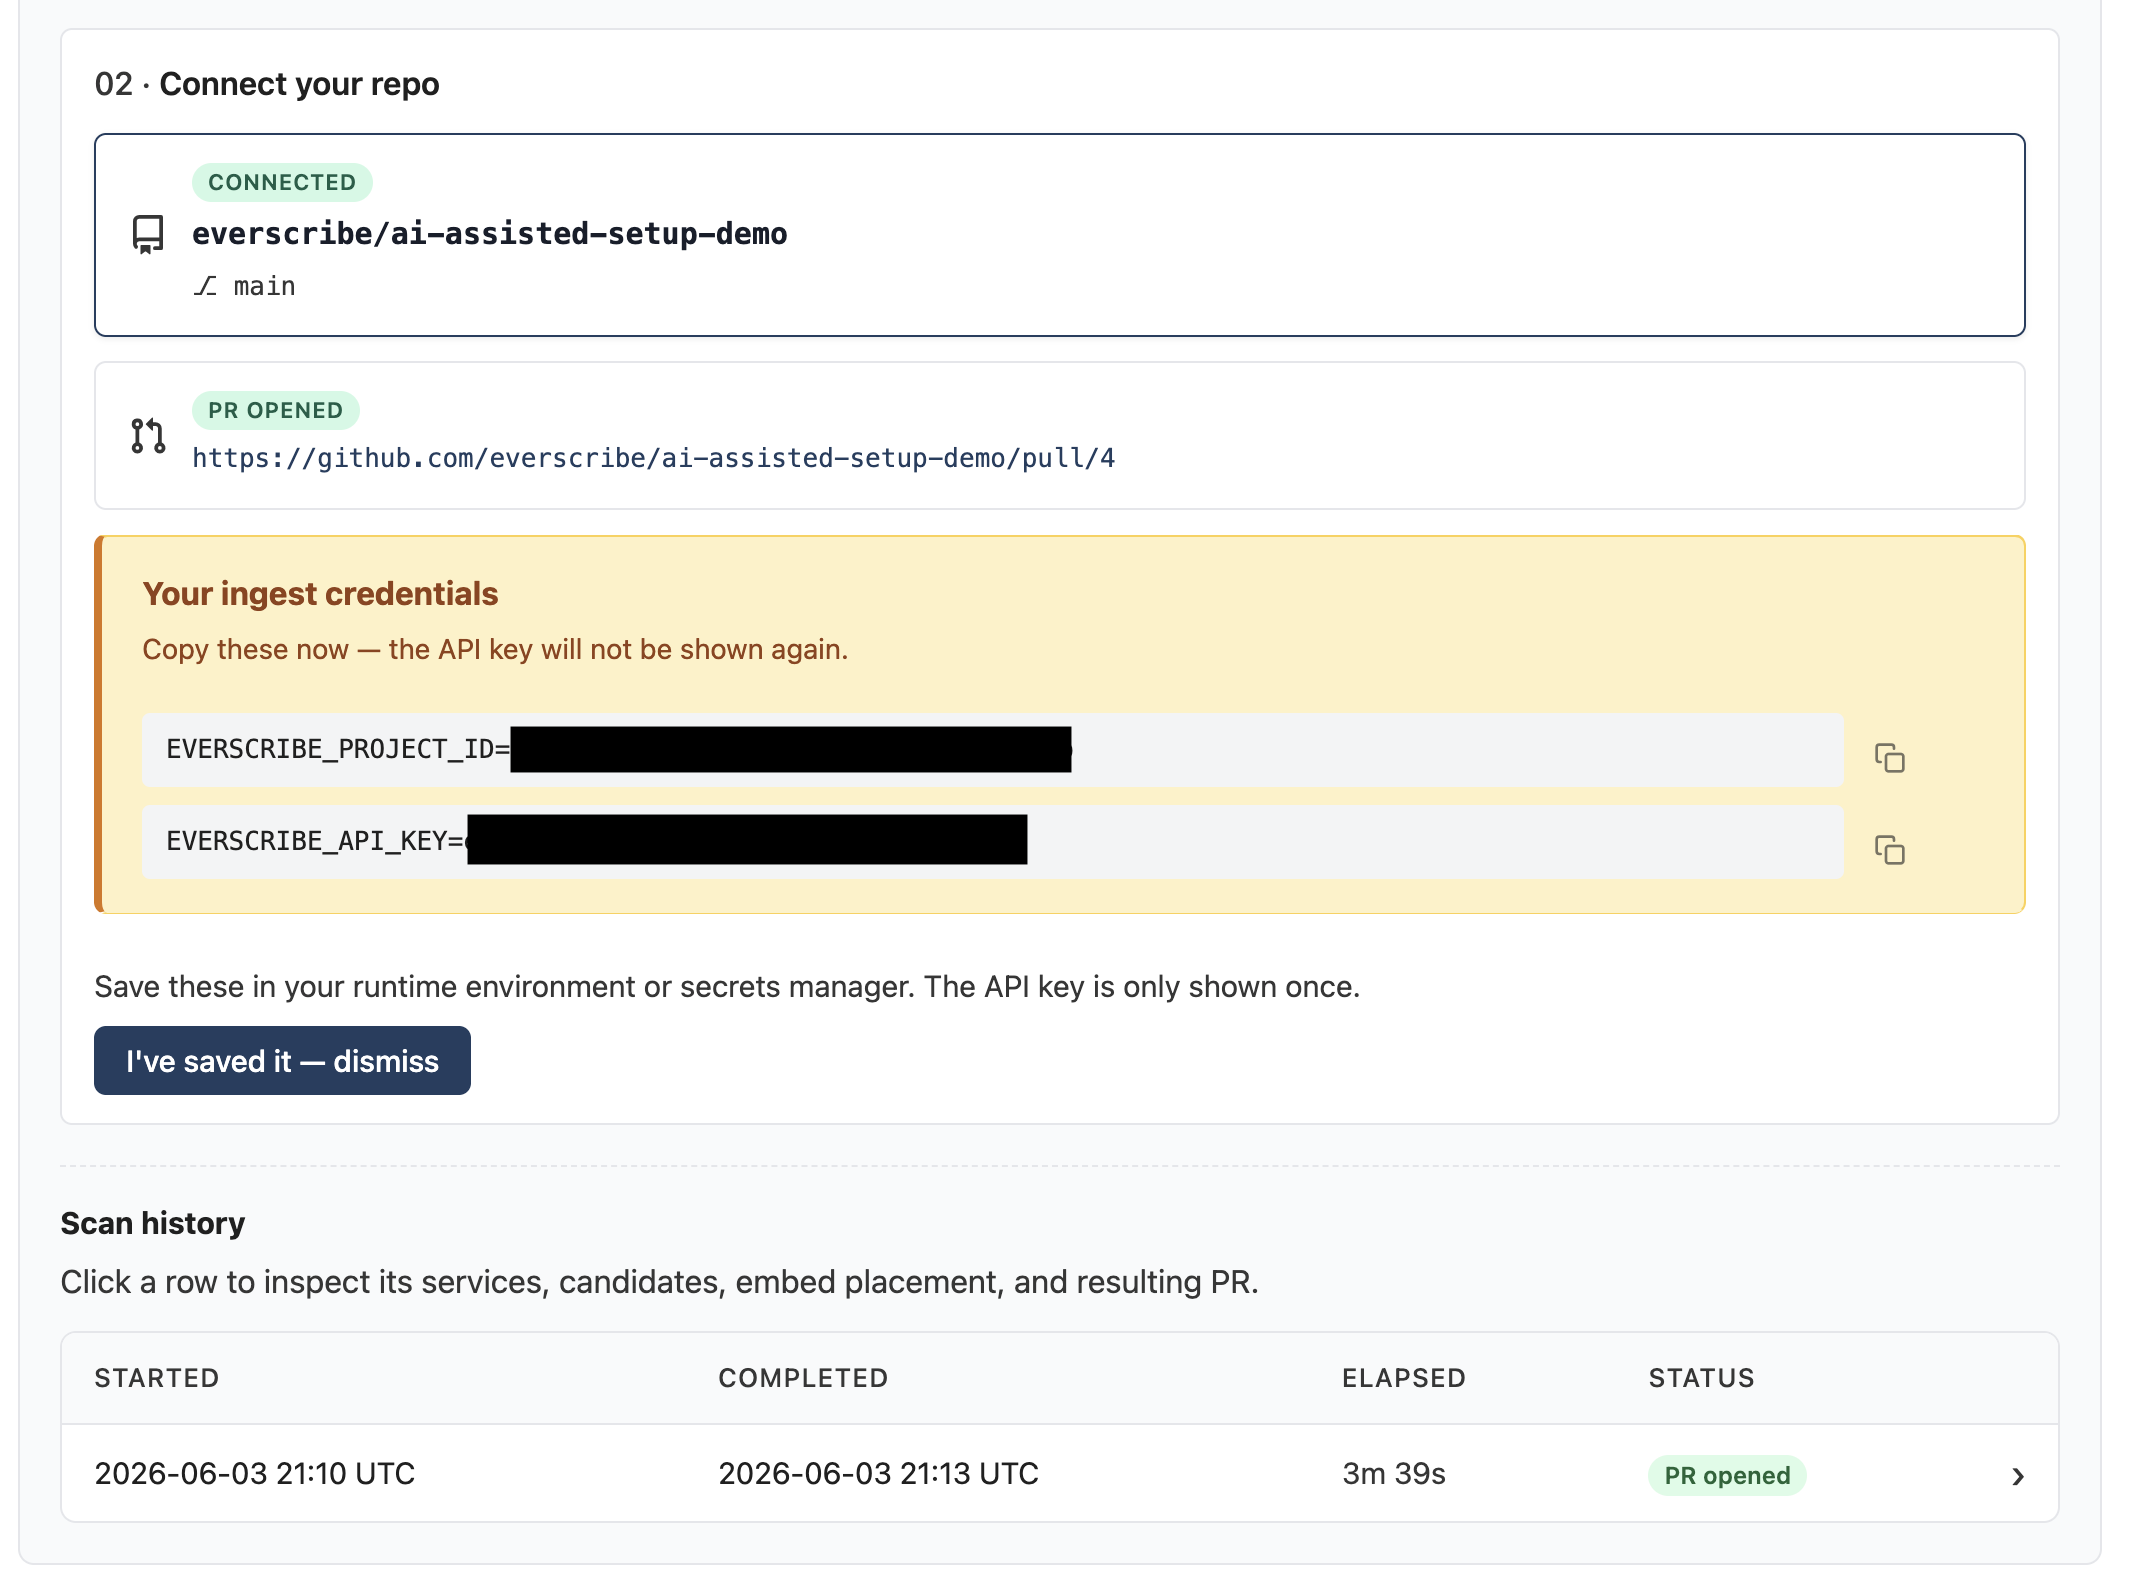
The key is scoped to this project; revoke or rotate at any time on the API keys tab. If a teammate will deploy the PR, share via your secrets store or have them mint their own key.
8. Review the PR on GitHub
Click the PR link or Disconnect to start fresh. On GitHub, the PR includes a structured body summarizing every event the diff adds, the tenant-source decision per handler, and a flag on any low-confidence files the agent escalated to Opus:
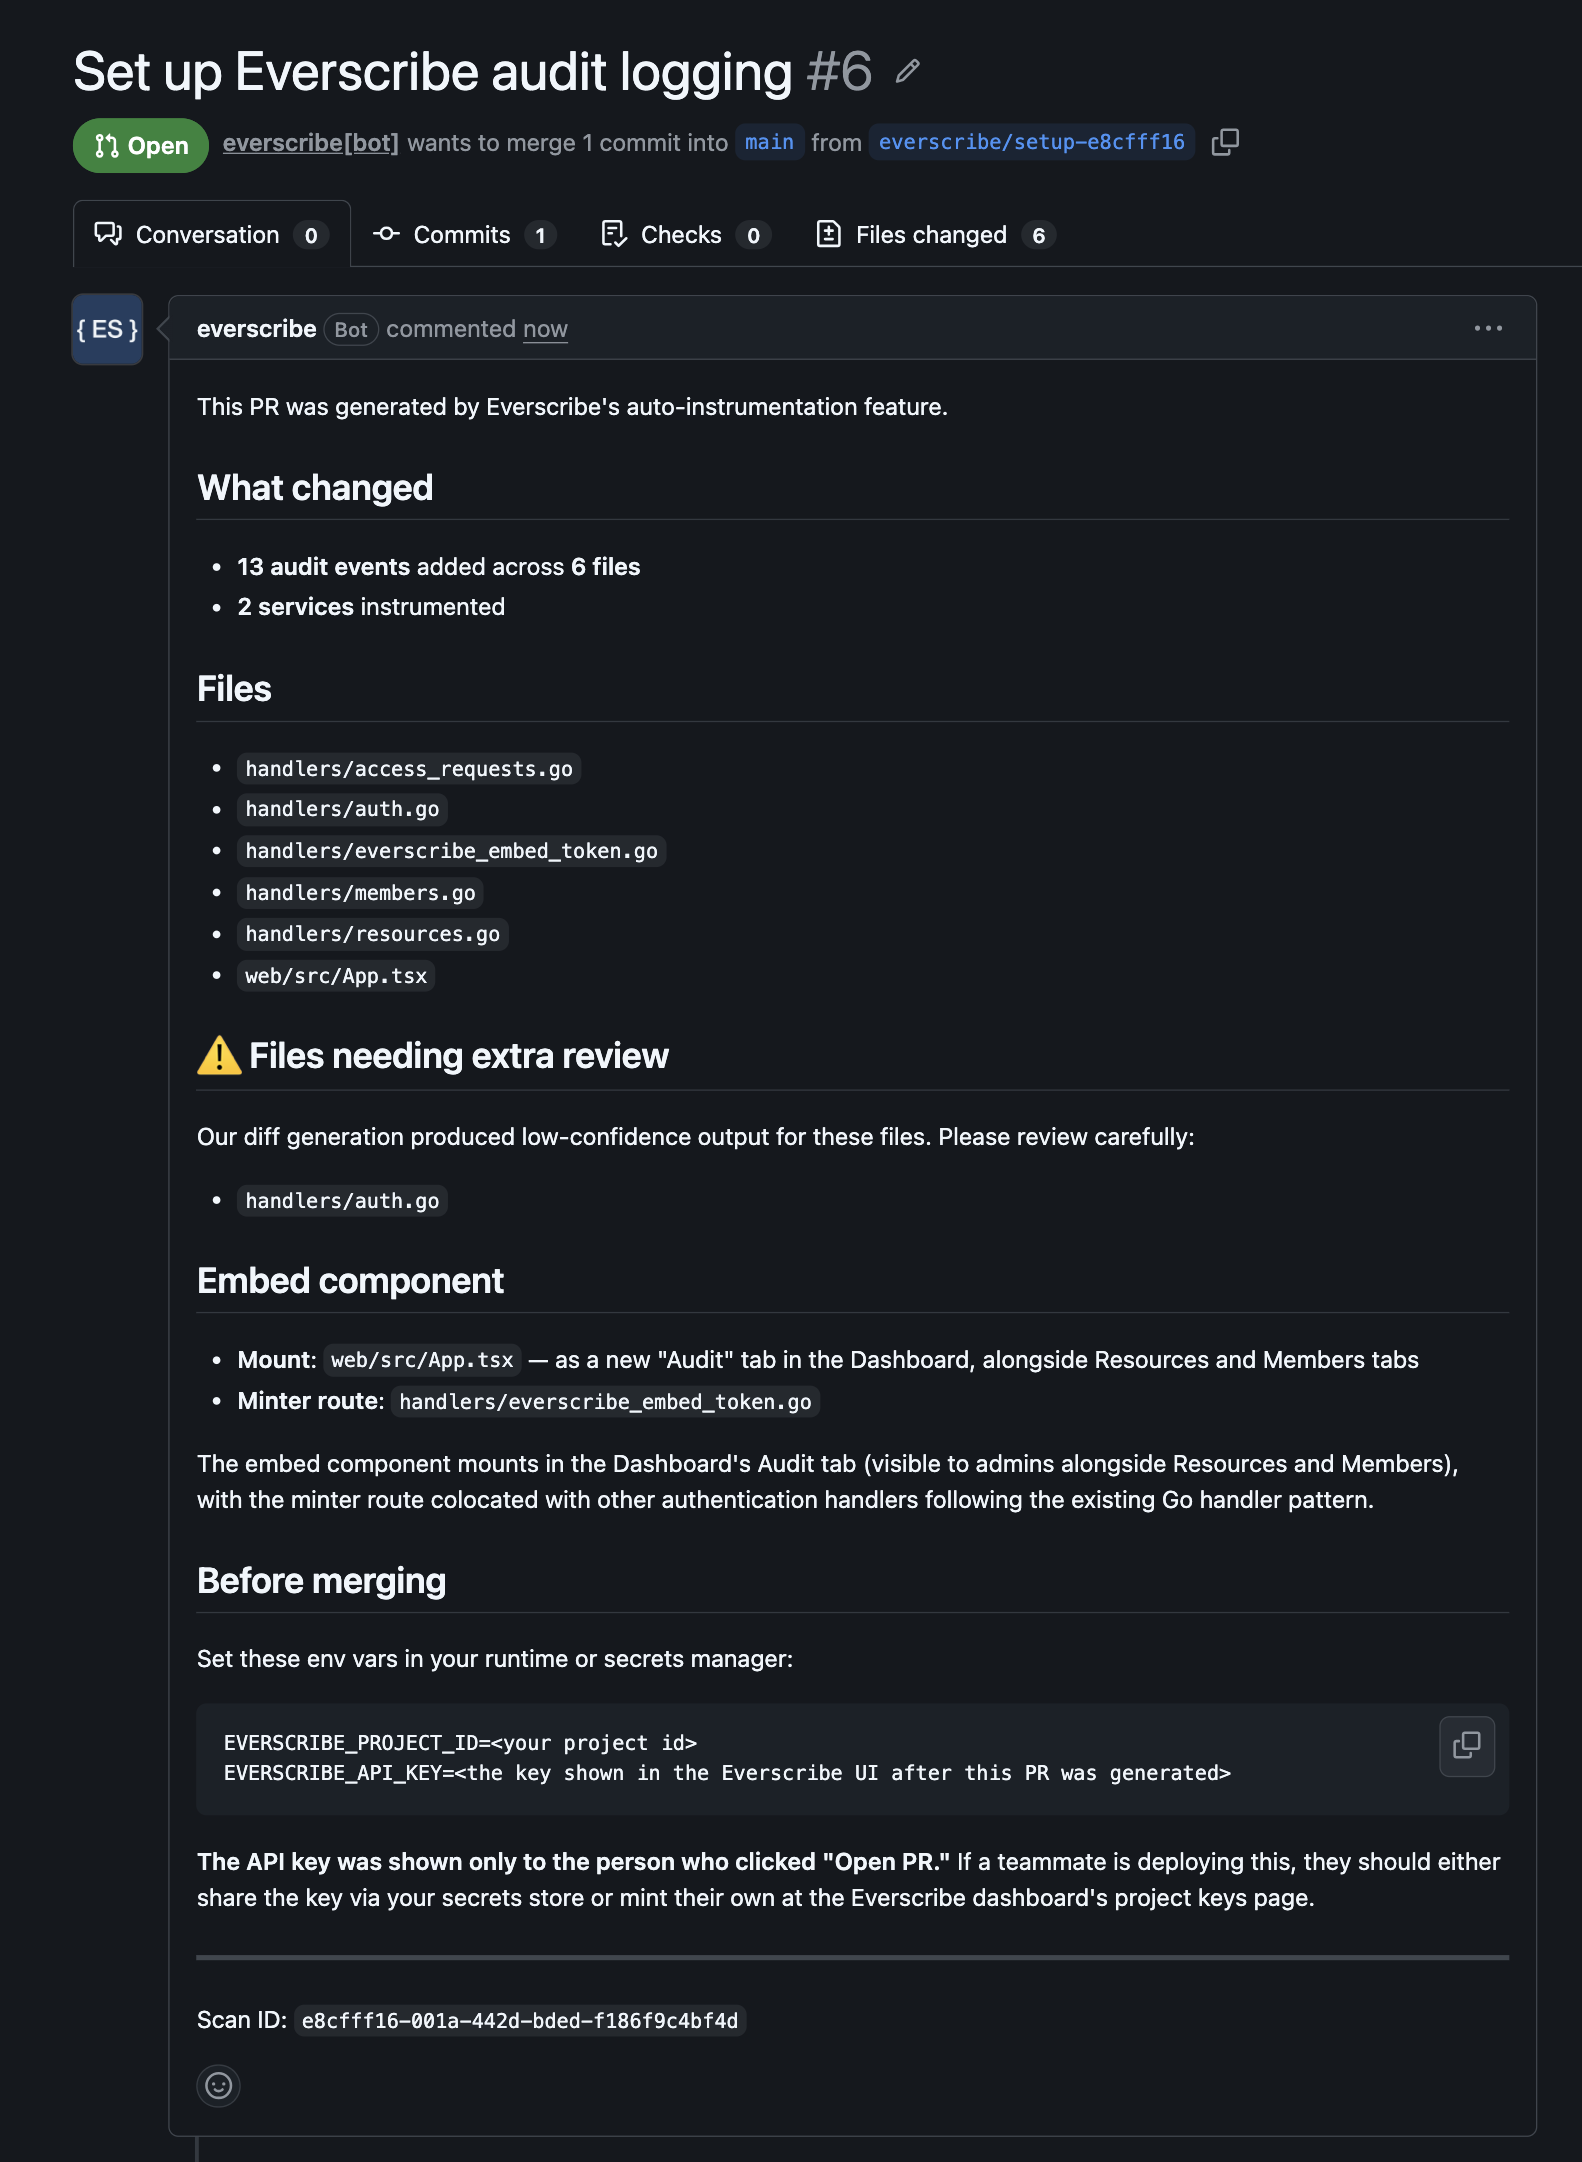
Merge when you're happy with it. The PR is meant to be merged — if anything looks wrong, you can re-run the scan, refine via chat, and open another PR. The branch name is everscribe/setup-<short> so multiple iterations don't collide.
9. Debugging a scan
If a scan didn't produce the PR you expected — missing files in the diff, no embed wiring even though you asked for it, the run took longer than seemed reasonable — every completed scan gets a per-scan debug page for inspecting exactly what happened.
Find it from your project's Overview tab. Inside the Configuration card's Setup with AI section, expand the Scan history table. Each row is a completed scan; click any row to open its debug view:
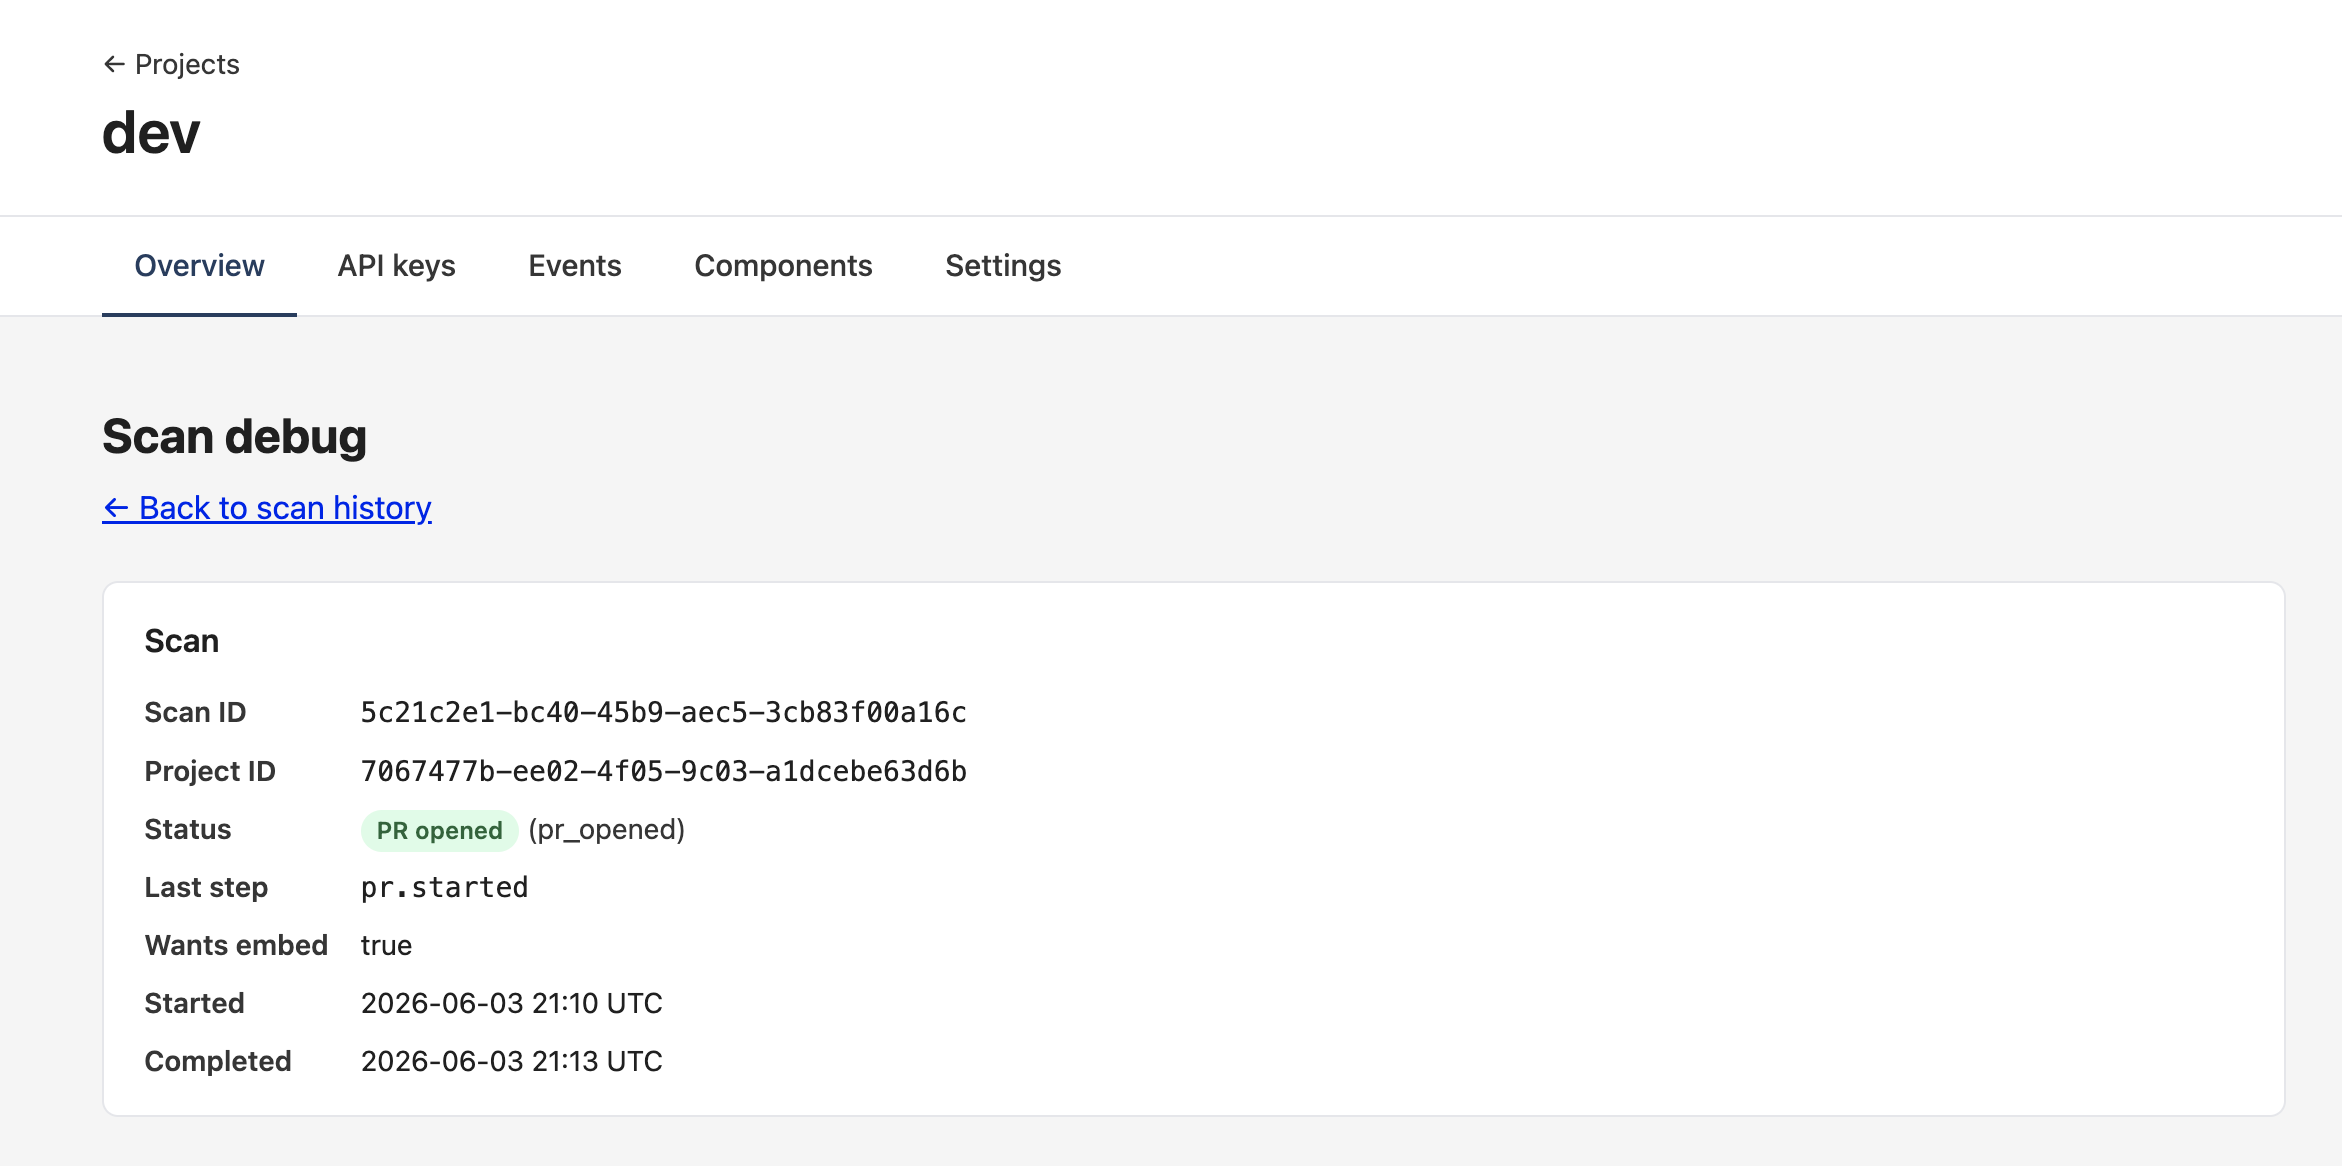
The page is read-only and lays out everything the runner persisted during the scan, top-to-bottom:
- Scan — IDs, status, the
stepmarker (useful for "where did the runner stall?"), wants_embed flag, started + completed timestamps, error reason if it failed. - Services — every service discovery identified, with framework. An empty framework on a service means the probe didn't recognize the manifest's deps — knock-on cause for skipped embed placement on a real frontend.
- Candidates — totals plus per-category + per-service breakdowns. The per-service view in particular surfaces "discovery probed this service but the agent proposed nothing" — common when the handlers are present but don't look auditable to the planner.
- Embed placement — only when
wants_embed=true. Shows the chosen mount + minter paths AND a byte count for each file's generated content. A zero on the mount or minter side means codegen didn't write that half (planning may have left the path empty, or the codegen loop burned its turn budget). - Pull request — PR number, URL, branch, opened-at, when the scan reached
pr_opened.
The biggest debug payoff is the Agent activity section at the bottom. It's a per-stage capture of the model's streamed narration — exactly what the agent said while running discovery / planning / embed-placement / coding / embed-codegen. Click a stage to expand the captured text:

Each stage's capture is bounded at ~160 KB raw — beyond that the middle is elided and a [... N bytes elided ...] marker appears between the head and tail so the start (what the agent started doing) and the end (what it finally emitted) stay readable. Stages that produced no narration are omitted entirely.
A few common diagnoses:
- Discovery captured but Planning empty — the planner short-circuited (no handlers to propose); check the candidate counts above for confirmation.
- Embed placement captured but
Mount content size: 0 bytes— the embed-codegen stage's turn budget hit the cap before the model emitted file content. Re-run the scan or refine via the embed-placement chat to nudge it. - Coding stage shows file reads but no final emit — the diff-gen agent escalated some files to a second pass; check the PR body's low-confidence callout to see which files needed Opus.
Retention note: Captured narration is kept for the 20 most recent completed scans per project. Older scans still appear in the history table and on the debug page, but their Agent activity section will be empty.
What the PR contains
For a backend-only setup, the diff:
- Adds
github.com/everscribe/sdk-go(or@everscribe/sdk-node) to your deps - Initializes a recorder in
main.go(or your entry file) reading credentials fromEVERSCRIBE_PROJECT_ID+EVERSCRIBE_API_KEY - Installs the audit middleware
- Adds
e.Action = "…",e.TenantID = <expr>, and anye.WithFields(...)/e.Diff(...)enrichment in each mutating handler
If you checked I plan to embed Everscribe UI components in step 2, the diff also:
- Adds
@everscribe/components-react(or the Svelte / Vanilla equivalent) to your frontend deps - Adds a tenant-scoped
/api/embed-token/*endpoint to the backend - Drops
<AuditTrail />into the SPA with the righttokenEndpointwiring
The store / domain types / existing routing aren't touched — only adds, no rearranging.
Limits and edge cases
- One repo per project. The hosted flow enforces this. Disconnect to swap repos.
- GitHub only in v1. GitLab / Bitbucket are on the roadmap.
- Default branch only. PRs target your repo's default branch. Pin a different base in GitHub after the PR opens if you need to.
- No auto-merge. Every PR waits on you. The agent opens it; you own the merge decision.
- Unsupported languages stop the scan. Discovery checks against the supported-SDKs manifest before spending tokens. If your service is in a language we don't yet ship an SDK for, the scan ends with a clean "ineligible" message and a link to request the language.
Read next
- BYOK skill flow — same agent behavior, runs in your Claude Code session
- Behavior reference — the shared rules both paths implement
- CLI · Skills — install + manage the BYOK skill from your terminal